22 Elegant Hairstyles for a Stunning, Polished Look

The right hairstyle can make an outfit feel finished, even when you have only a few minutes to get ready.
From sleek buns to soft waves, small styling details can create a polished look without a complicated salon routine.
These 22 elegant hairstyles offer inspiration for weddings, dinners, work events, celebrations, and days when you simply want your hair to look more put together. You will find classic updos, glossy curls, braided details, and relaxed half-up styles, along with practical tips for shaping and securing each look. The best choice depends on your hair length, texture, outfit, and how much time you have. For a smoother finish, start with detangled hair and use heat protectant before styling with hot tools. Save the ideas that suit your routine, then adapt the details to feel comfortable and true to your personal style.
1. Sleek Low Bun

A sleek low bun can make a simple outfit look considered, especially when the hairline is smooth and the shape sits neatly at the nape. Start with dry, brushed hair and choose a center or soft side part. A little smoothing cream controls flyaways without a greasy finish.
Gather hair at the nape, twist it into a compact coil, and secure it with pins that match your hair color. For a softer finish, leave two fine strands near the temples and curl them lightly. Of all elegant hairstyles, this one is especially useful for weddings, office events, and dinners. Mist flexible-hold hairspray from arm’s length, then check the profile in a mirror so the bun looks balanced from the side as well as the front.
2. Soft Hollywood Waves
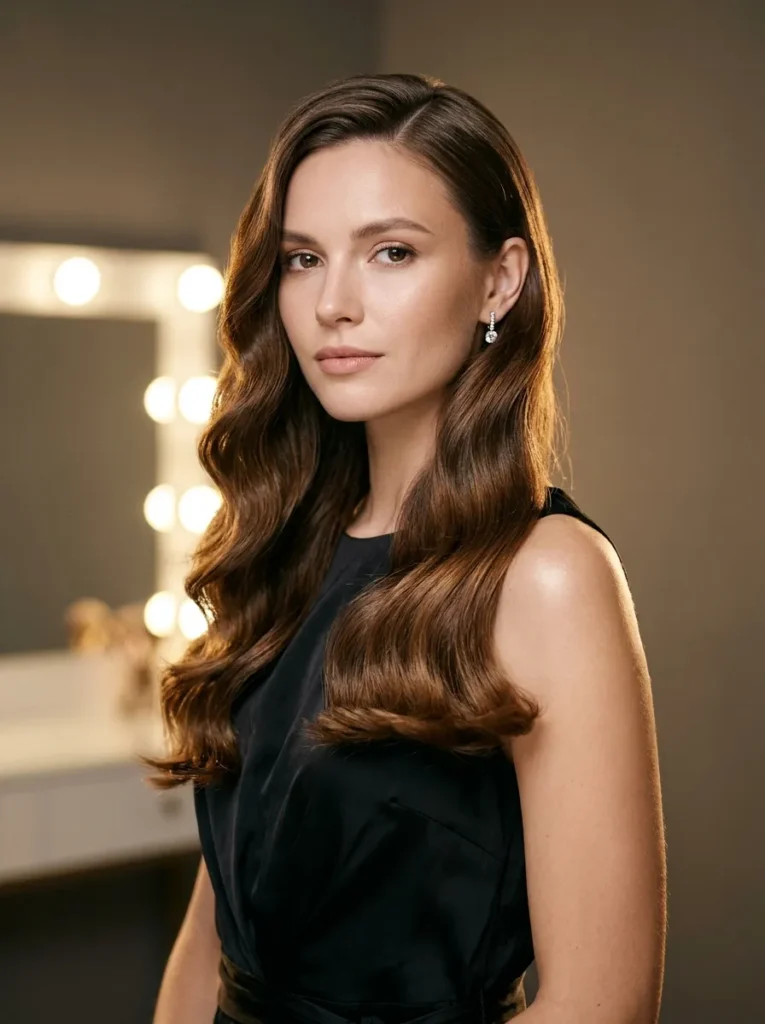
- For waves that look polished rather than pageant-like, start with completely dry hair and apply heat protectant.
- Create a deep side part to give the style a classic red-carpet finish.
- Curl small sections in the same direction, keeping the iron vertical for a consistent wave pattern.
- Let each curl cool completely before brushing it gently into a smooth S shape.
- Finish with flexible-hold hairspray and a tiny drop of shine serum on the ends.
Hollywood waves shine most on medium to long hair, but a smaller curling barrel can create a similar curve on shorter lengths. Keep the wave pattern consistent, then brush gently to blend each curl into an S shape. Finish with light-hold spray, not stiff lacquer, so the hair still moves naturally.
3. French Twist Updo

Quick Tip:
Build the twist over slightly textured hair rather than freshly conditioned, slippery strands. Use crossed bobby pins that match your hair color and anchor them into the folded section, not just the outer layer.
French twists look complicated, but the shape becomes easier when you work in small, controlled sections. Gather hair low, roll it upward against the head, and tuck the ends inside the fold. Secure from the seam inward, then smooth the surface with a soft brush for a clean finish that suits formal events.
4. Polished High Ponytail

BEFORE: A rushed ponytail can look uneven when the elastic sits too low or loose strands puff around the crown. The result may feel more casual than the outfit calls for.
AFTER: A high placement, smooth roots, and a wrapped base create a cleaner silhouette. The lifted shape opens the face and keeps long hair away from the shoulders.
For a secure finish, tip your head slightly forward while gathering the hair, then check the ponytail from the side before tightening the elastic. Wrap a thin section around the base and pin it underneath. This detail hides the band and makes the style look intentional without needing a complicated updo.
5. Pearl-Accent Chignon
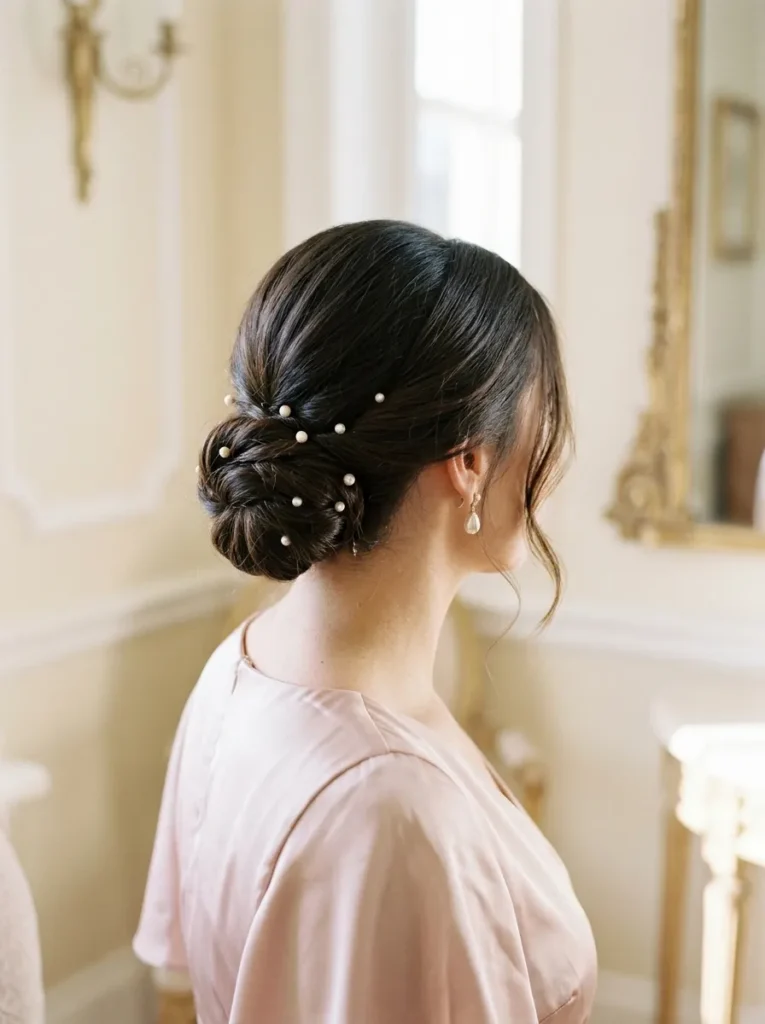
- Create a clean part. Brush your hair into a low ponytail and secure it with a small elastic. Smooth the sides with a little styling cream.
- Form the chignon. Twist the ponytail loosely, coil it around the base, and tuck the ends underneath.
- Secure the shape. Insert bobby pins around the coil, catching both the bun and the hair beneath it.
- Add pearl accents. Place two or three pearl pins along one side of the bun, spacing them evenly rather than crowding them together.
Pearl details add interest without overwhelming the hairstyle. For a wedding guest look, pair the chignon with simple earrings and a neckline that leaves the bun visible. If your hair is fine, lightly tease the ponytail before coiling it to give the finished shape more fullness.
Also Visit : 21 Stunning Blowout Hairstyles for Bouncy, Silky Hair
6. Half-Up Crown Twist
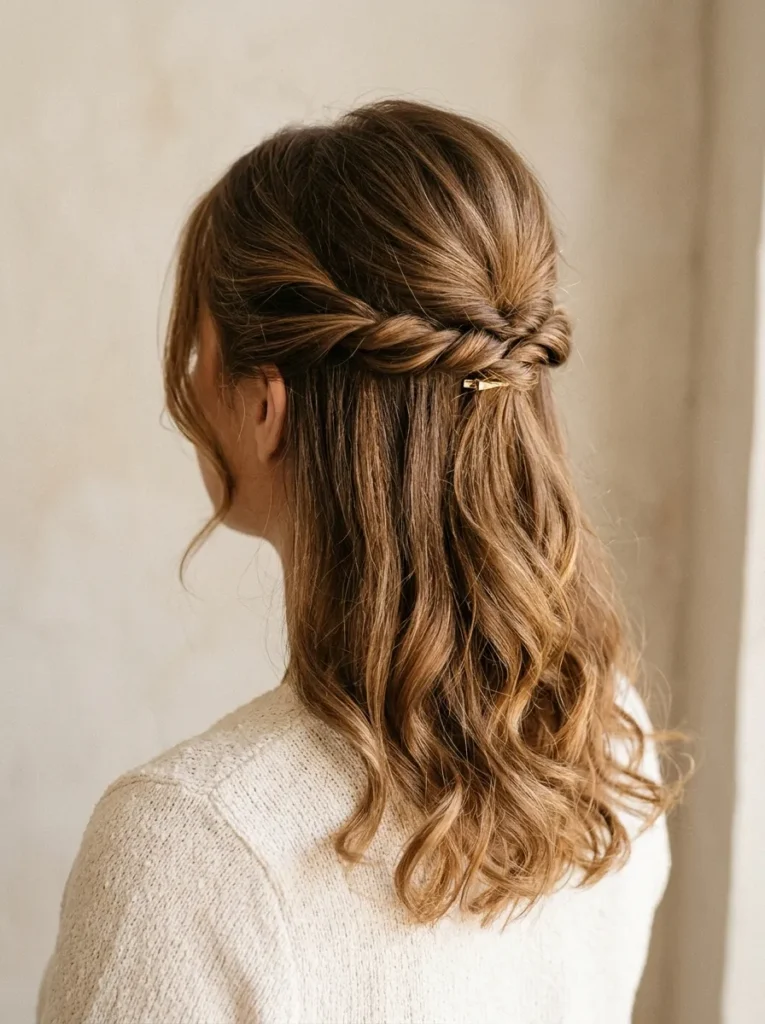
| Detail | Option A: Loose Twist | Option B: Structured Twist |
| Overall finish | Soft and relaxed | Smooth and defined |
| Best occasion | Brunch, garden parties | Weddings, formal dinners |
| Hair texture | Natural waves or curls | Straight or lightly waved |
| Main technique | Loosely cross and pin sections | Twist firmly and secure at each side |
The half-up crown twist keeps hair away from your face while allowing the length to flow freely. Take equal sections from above each ear, twist them backward, and secure them where they meet. Leave enough slack to avoid pulling at the temples, then curl the loose ends for a coordinated finish.
7. Braided Crown Updo

DO:
- Create a center part and divide the hair into two even sections.
- Braid each section from the front toward the nape, keeping the tension comfortable.
- Cross the braids over the back of the head and tuck the ends underneath.
- Secure the braid edges with discreet bobby pins that match your hair color.
DON’T:
- Pull the braids so tightly that they strain your scalp.
- Leave bulky ends visible beneath the crown.
- Add too many decorative pins that compete with the braid pattern.
The braided crown creates a detailed, graceful finish that works especially well for weddings, formal dinners, and outdoor celebrations. In my experience, slightly textured hair is easier to braid and pin than freshly washed, slippery strands. A light mist of flexible-hold spray helps keep small sections in place without making the braid look stiff.
8. Glass Hair Bob
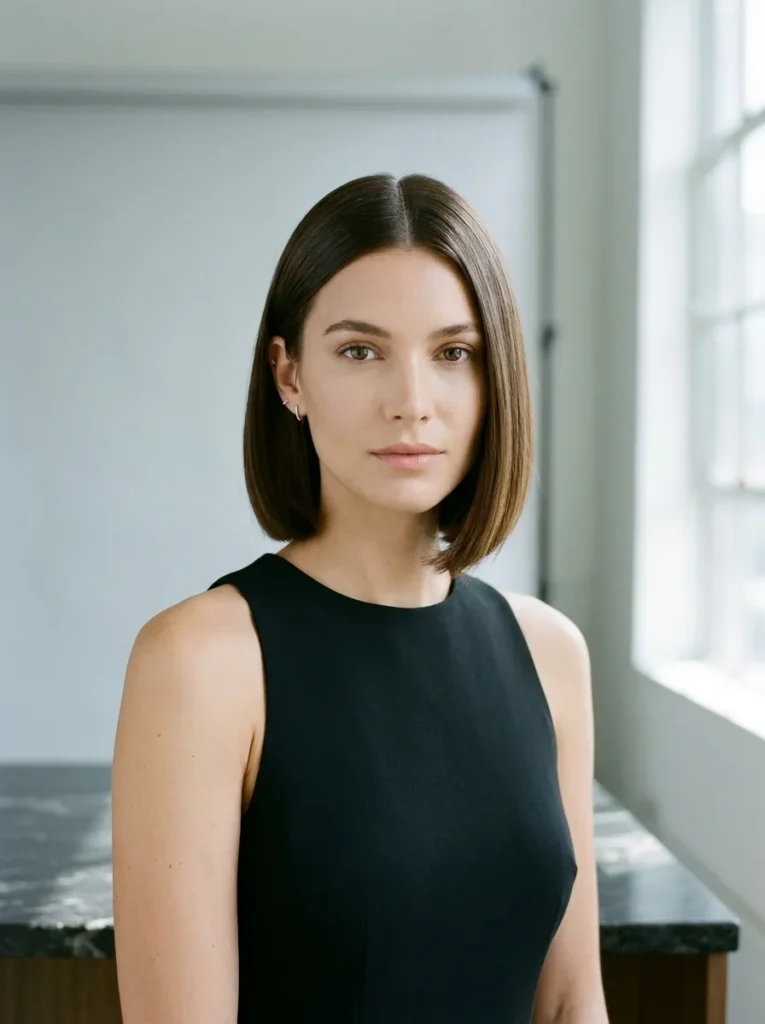
Best For: Short to medium hair, professional events, polished everyday looks.
Styling Time: Approximately 10 to 20 minutes, depending on hair thickness.
Skill Level: Beginner to intermediate.
Key Detail: Smooth ends and a clean outline create the signature glass-like finish.
A glossy bob proves that a refined look does not need elaborate pinning or intricate braids. Start with a heat protectant, then blow-dry in small sections using a paddle brush or round brush to guide the ends into a gentle curve. A flat iron can refine stubborn pieces, but avoid repeated passes over the same section. Finish with a small amount of lightweight shine serum, concentrating on the mid-lengths and ends. Keep the part sharp and the outline neat so the haircut itself remains the focus.
9. Twisted Low Ponytail

A simple ponytail becomes more distinctive when the top sections form a neat twist instead of lying flat against the head. Begin by separating a small section above each ear, then gather the remaining hair at the nape with a clear elastic. Twist one side backward and pin it discreetly before repeating on the other side.
Bring both twisted sections over the ponytail base and secure them underneath with bobby pins. Wrap a narrow strand around the elastic to hide it, then smooth the length with a brush. This style works particularly well for medium to long hair, especially when you want a tidy look that still moves naturally.
10. Side-Parted Glamour Curls

- Create a deep side part while your hair is dry and detangled.
- Apply heat protectant evenly before using a curling iron.
- Curl medium-sized sections away from your face, keeping the direction consistent on each side.
- Allow the curls to cool completely before separating them gently with your fingers.
- Finish with flexible-hold hairspray and a small amount of shine serum on the ends.
The secret to glamorous curls is controlling the volume without making the hair look stiff. Brush the roots lightly for lift, then arrange the curls so they fall over one shoulder. This creates a defined silhouette that complements evening gowns, cocktail dresses, and statement earrings.
Also Visit : 24 Flattering Short Bob Hairstyles You’ll Absolutely Love
11. Delicate Floral Bun

Quick Tip:
Choose lightweight floral pins or small artificial flowers with secure clips. Place them after pinning the bun, then gently tug each piece to check that it will stay in place throughout the event.
A floral bun pairs beautifully with soft fabrics, delicate jewelry, and outdoor celebrations. Gather the hair into a low twist, secure it with bobby pins, and leave a little texture around the crown rather than flattening every strand. Position the flowers on one side for a balanced finish. If your event is outdoors, secure the accessories firmly and use flexible-hold spray to help control loose pieces.
12. Smooth Side-Swept Updo
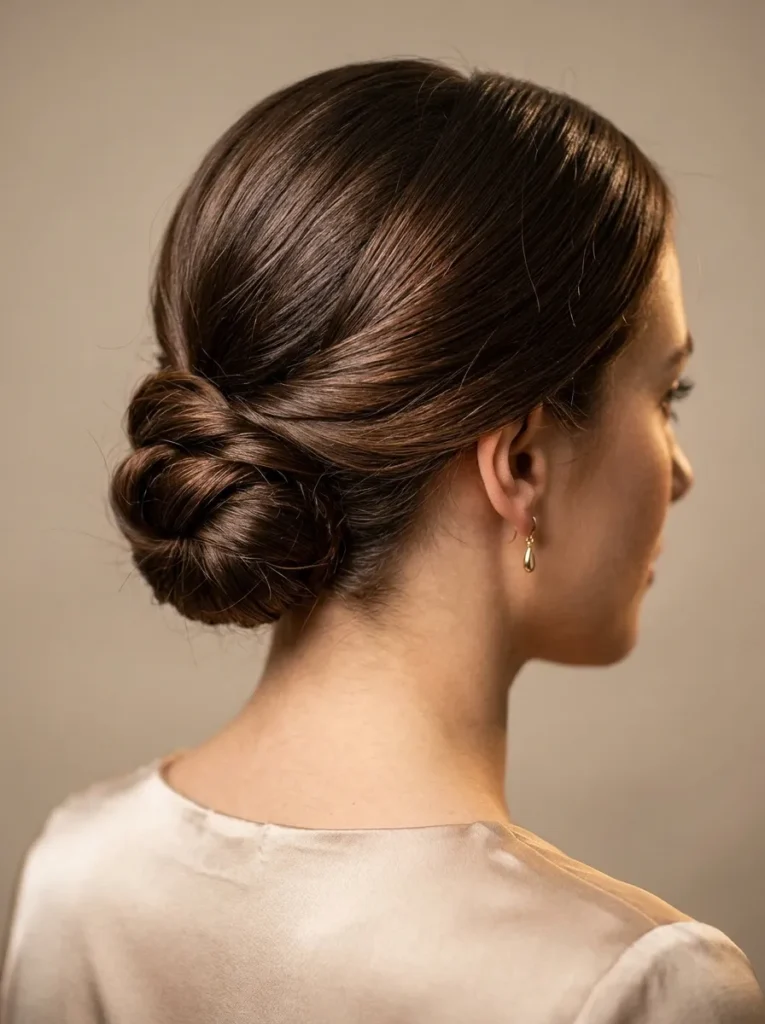
BEFORE: Hair that is gathered without a clear direction can look uneven, especially when the front pieces separate or the bun sits awkwardly against the head. Loose pins may also cause the style to shift during a long event.
AFTER: A deliberate side sweep creates a continuous, smooth line from the forehead toward the bun. The angled shape adds visual interest while keeping the neck and shoulders clear.
Start with a deep side part and brush the front section diagonally across the crown. Gather the remaining hair into a low side bun, then pin the swept section beneath or around it. Check the style from the front and both sides before finishing with light hairspray. This arrangement works especially well with one-shoulder dresses and earrings you want to show off.
13. Classic Ballet Bun

- Brush thoroughly. Remove tangles and smooth the hair upward toward the crown, using a little styling cream to control flyaways.
- Secure a high ponytail. Choose a position that feels comfortable and check the placement from the side before tightening the elastic.
- Twist and coil. Wrap the ponytail around its base, keeping the coil even rather than pulling it into a bulky knot.
- Pin the bun. Insert bobby pins around the edges and finish with a light mist of hairspray.
The ballet bun keeps hair neatly away from your face and gives the neck a longer, cleaner appearance. For fine hair, a small bun maker can add fullness without requiring extra length. For thick hair, divide the ponytail into two sections before wrapping to make the coil easier to control.
14. Vintage Finger Waves
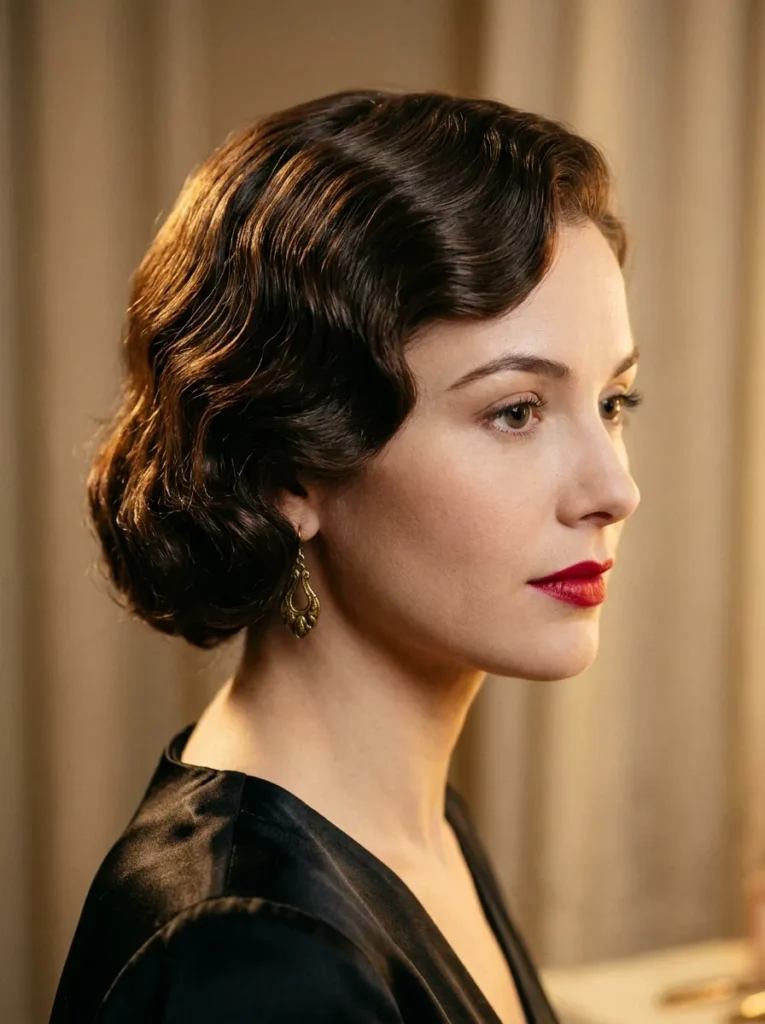
| Styling Detail | Option A: Defined Waves | Option B: Soft Retro Waves |
| Finish | Crisp, sculpted curves | Gentle, brushed curves |
| Main technique | Styling gel and finger shaping | Curling iron and careful brushing |
| Best length | Short bob or pixie styles | Short to medium hair |
| Overall feel | Dramatic and formal | Soft and understated |
Vintage waves bring a distinctive, polished character to short hair, especially for cocktail parties, formal dinners, and themed celebrations. Work with damp hair when creating traditional finger waves, shaping each curve with a comb and your fingers. Allow the style to dry fully before adding a light finishing spray for hold and shine.
15. Ribbon-Tied Ponytail

DO:
- Choose a satin ribbon that complements your outfit without matching it too exactly.
- Secure the ponytail with a strong elastic before tying the ribbon around the base.
- Keep the bow balanced, with both loops and tails arranged neatly.
- Curl the ends lightly if you want extra movement and softness.
DON’T:
- Tie the ribbon so tightly that it pulls on the hair.
- Use a heavy accessory that makes the ponytail sag.
- Leave uneven ribbon tails that distract from the overall shape.
A ribbon adds a graceful finishing touch to an otherwise simple ponytail. For a polished result, use a medium-width satin ribbon and let its tails fall naturally along the hair. This style suits brunches, birthday dinners, and daytime weddings. Secure the bow with a discreet pin if you will be moving around frequently.
Also Visit : 22 Edgy Short Haircuts for a Bold, Confident New Look
16. Textured Side Braid
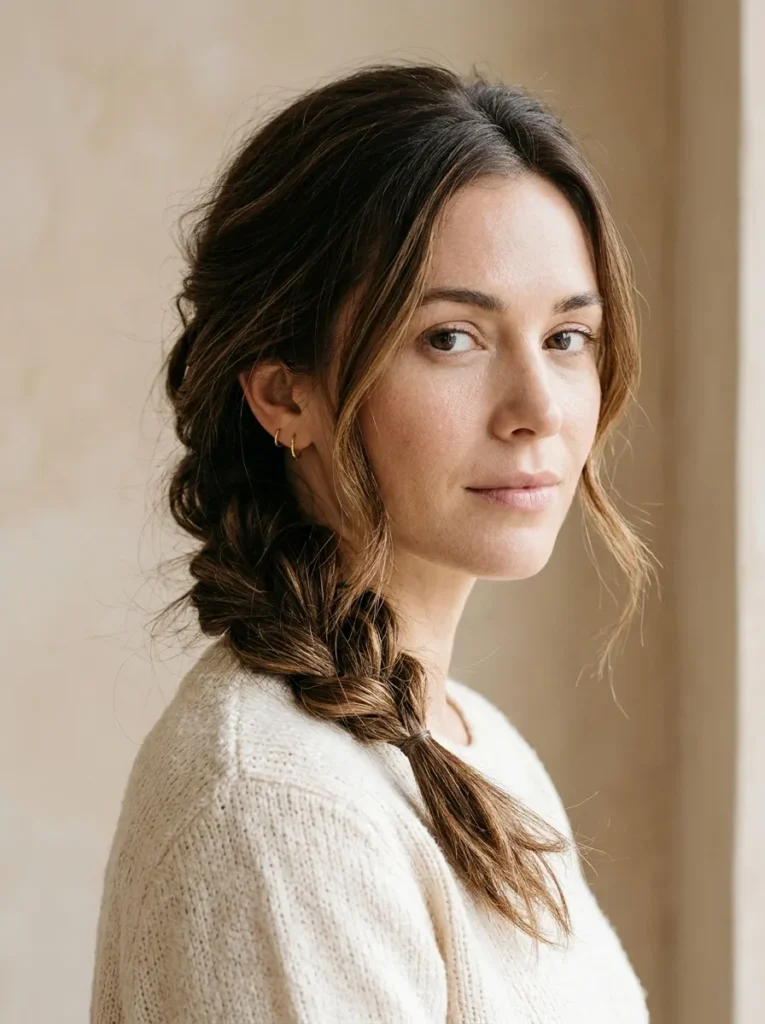
Best For: Medium to long hair, casual celebrations, garden parties.
Styling Time: 10 to 15 minutes.
Skill Level: Beginner.
Key Detail: Gentle pulling along the braid edges creates a fuller, softer shape.
A side braid feels refined when the sections are even but not pulled too tightly. Sweep your hair over one shoulder, divide it into three sections, and braid downward while keeping the tension comfortable. Secure the end with a clear elastic, then gently loosen the outer loops with your fingertips. A few face-framing strands soften the finish, while a small ribbon or discreet hairpin adds detail without making the style feel overly decorated. For slippery hair, apply a little texturizing spray before braiding to help the sections stay in place.
17. Sculpted Chignon
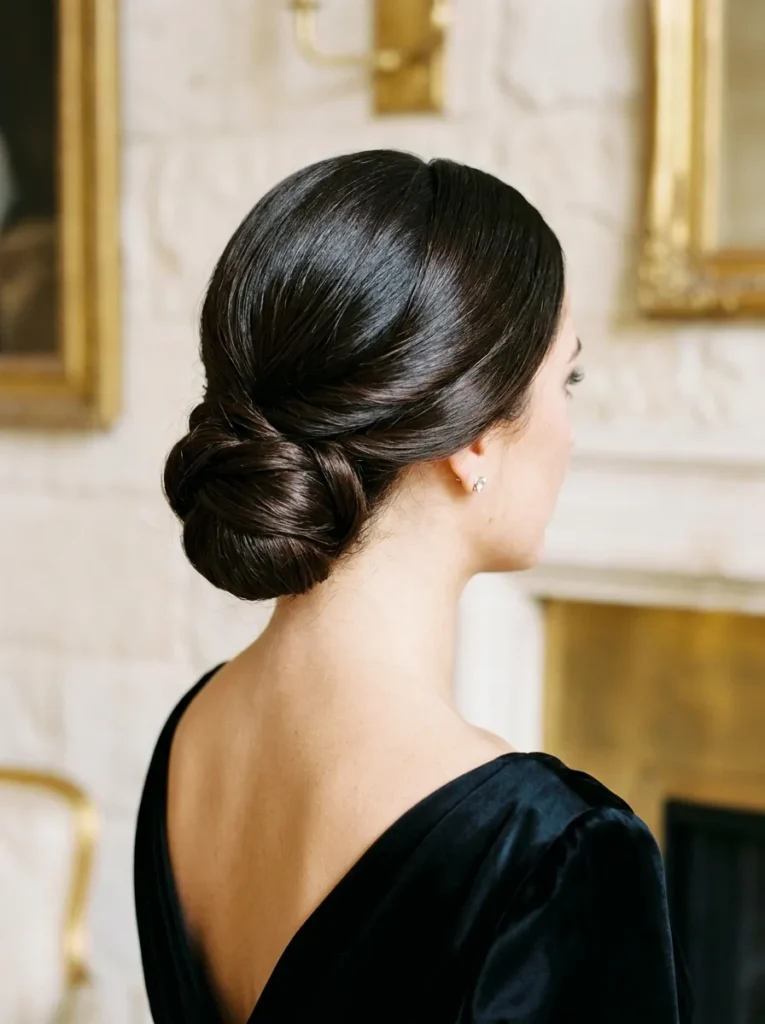
A sculpted chignon creates a graceful outline that looks especially striking with a simple neckline and delicate earrings. Start by making a neat center or side part, then gather your hair at the nape and secure it into a low ponytail. Twist the length and fold it into an oval shape, tucking the ends underneath.
For a more structured finish, arrange the folded hair in overlapping sections and pin each one discreetly. Check the back with a hand mirror to catch loose ends or uneven edges. A small amount of smoothing cream helps control flyaways, but avoid using too much product, which can leave the hair looking heavy or greasy.
This style works particularly well for formal dinners, evening receptions, and occasions where you want your hairstyle to stay neat for several hours. Keep the shape compact for a classic look, or leave a little crown volume for a softer finish.
18. Loose Curled Half-Up

- Prepare the hair: Apply heat protectant to dry, detangled hair before creating loose curls.
- Curl in sections: Use a medium-barrel curling iron and alternate the curl direction for natural-looking movement.
- Create the half-up shape: Gather the hair from above both ears and bring it toward the back of the head.
- Secure gently: Use a small elastic or decorative barrette, leaving enough room to maintain soft crown volume.
- Finish the waves: Separate the curls with your fingers and use a light mist of flexible-hold hairspray.
The loose half-up style offers a lovely balance between an updo and flowing hair. It keeps the front sections away from your face while letting the curls frame your shoulders. Choose a simple gold clip for evening wear or a pearl accessory for a wedding guest outfit. Avoid pulling the gathered sections too tightly, because a little softness gives this hairstyle its relaxed, polished finish.
19. Knotted Low Ponytail

Styling Time: 10 to 15 minutes.
Best For: Medium to long hair, office events, dinner dates.
Skill Level: Beginner to intermediate.
Key Detail: The wrapped knot conceals the elastic and gives a simple ponytail a more finished appearance.
A knotted ponytail adds interest without requiring a complicated updo. Gather your hair at the nape and secure it with an elastic, leaving a small section free. Wrap that section around the base, cross the ends neatly, and secure them underneath with a discreet bobby pin. Keep the ponytail smooth for formal occasions or add loose waves for a softer finish. This small detail works particularly well with open-back tops and statement earrings because it keeps the hair tidy while showing off your accessories.
20. Side-Swept Curls

Side-swept curls bring instant definition to an evening look while keeping one side of the neckline visible. Start with dry hair and apply a heat protectant before curling medium-sized sections. Allow the curls to cool before brushing them gently into a smooth, connected shape.
Move the hair over one shoulder and secure a small section behind the opposite ear with a discreet pin. This helps prevent the curls from slipping forward as you move. I’ve noticed that a deep side part often gives this style a more defined silhouette, especially on hair with natural volume. Finish with flexible-hold spray and keep heavy products away from the roots. Among elegant hairstyles, this one pairs especially well with asymmetrical dresses, off-shoulder necklines, and long earrings.
Also Visit : 21 Half Up Half Down Hairstyles for a Dazzling Look
21. Braided Low Bun

- Brush your hair thoroughly and create a center or side part.
- Gather the hair into a low ponytail at the nape, securing it with a small elastic.
- Braid the ponytail to the ends and fasten it with another elastic.
- Coil the braid around its base, keeping the bun flat and evenly shaped.
- Secure the edges with bobby pins, then finish with a light mist of hairspray.
Braiding before coiling gives the bun extra texture and helps keep the shape organized. For thicker hair, make the braid slightly loose so the finished bun does not become too bulky. A few subtle gold pins can add detail for weddings or formal dinners, while a simple finish keeps the style suitable for professional events. Check that the bun feels secure before leaving home.
22. Twisted French Chignon

Styling Time: 15 to 20 minutes.
Best For: Weddings, formal dinners, evening receptions.
Skill Level: Intermediate.
Key Detail: A smooth twist with neatly tucked ends creates the signature polished finish.
A twisted French chignon combines the structure of a classic updo with a softer, modern finish. Brush your hair to one side, twist it upward along the back of your head, and tuck the ends inside the fold. Secure the seam with bobby pins, adding pearl pins for a delicate finishing touch. Keep the crown slightly relaxed rather than tightly pulled for a comfortable style that looks elegant from every angle.
CONCLUSION
A polished hairstyle does not need to be complicated. The ideas in this guide offer options for different hair lengths, occasions, and styling abilities, from a neat low bun to soft, romantic curls. Choose a look that works with your outfit and the time you have, then use small details such as a clean part, secure pins, or a simple accessory to finish it well. Save this collection of elegant hairstyles on Pinterest so your favorites are easy to find when an event comes up. Try one this week, and share the article with someone looking for fresh hair inspiration.