24 Playful Cute Short Hairstyles You’ll Want to Try

Short hair can be playful, polished, and full of personality without taking a long time to style. The right cut or a simple finishing detail can make your everyday look feel fresh.
These 24 cute short hairstyles bring together easy inspiration for bobs, pixie cuts, curls, waves, braids, and pretty accessories. Whether your hair is naturally straight, wavy, or curly, you’ll find ideas that can work with your texture and the length you already have.
Each look includes practical styling guidance, so you can see what to ask for at the salon and how to recreate the finish at home. Before choosing a cut, think about your daily routine, styling time, and how often you’re comfortable booking trims. Save the ideas you love and bring your favorites to your next appointment.
1. Textured French Bob
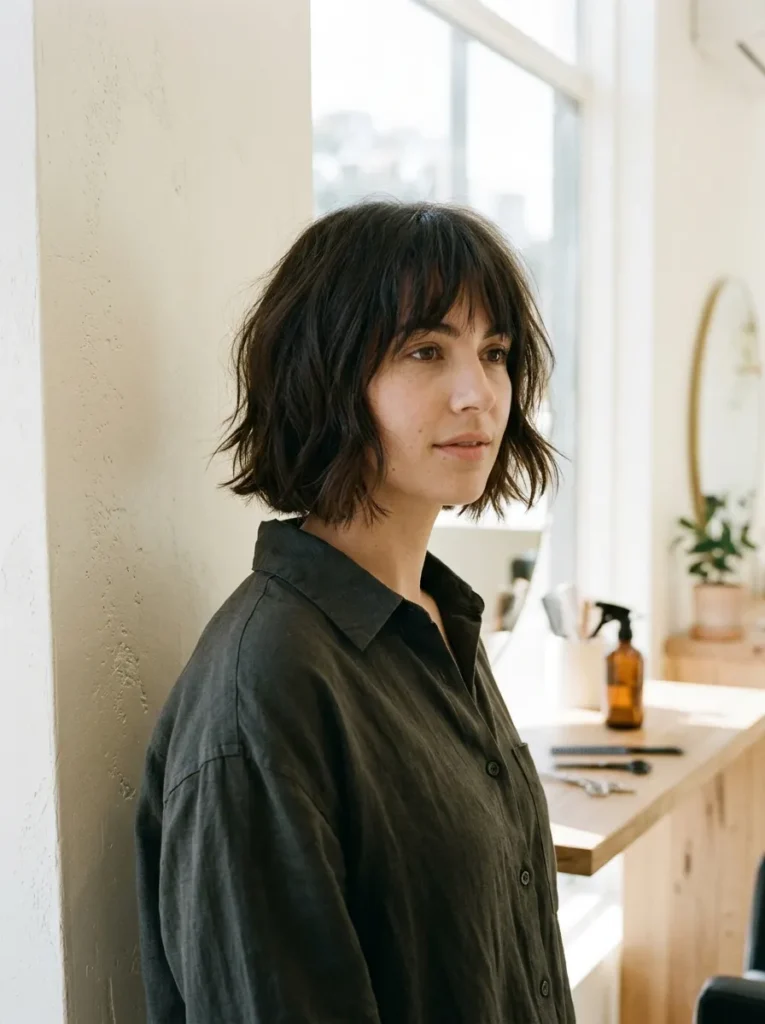
For anyone saving cute short hairstyles, a textured French bob offers a lively mix of polish and movement. The length usually sits around the jaw, while softly chopped ends create a relaxed outline. A little bend through the sides keeps the shape from looking too severe.
Ask your stylist for light internal texture rather than heavily thinned ends. For styling, work a little cream through damp lengths, then air-dry or shape a few pieces with a flat iron. Finish with your fingers instead of a stiff brush to keep the movement natural.
2. Piecey Side-Swept Pixie
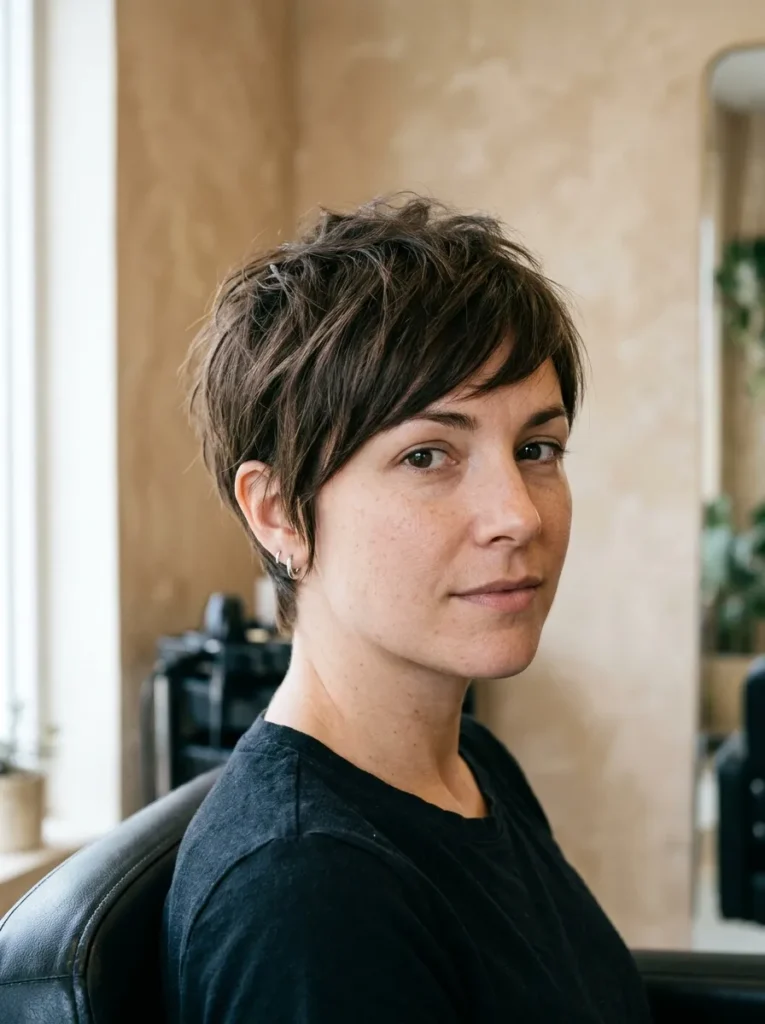
- Ask for a longer fringe that sweeps across the forehead, with shorter layers through the crown.
- Keep the nape neatly tapered so the profile stays light and clean.
- Blow-dry the fringe forward first, then guide it to the side with a small round brush.
- Rub a pea-sized dab of matte paste between your fingertips and pinch a few crown pieces for definition.
That diagonal fringe gives a pixie a softer outline and draws attention to the eyes without hiding the haircut’s shape. It also offers styling flexibility: wear it smooth for a neat finish or tousle the crown for more lift. A small amount of paste is usually enough.
3. Mini Half-Up Top Knot

Quick Tip:
Gather only the top section from the temples back to the crown. A small clear elastic gives a secure base; wrap a narrow strand around it to hide the band.
A mini knot adds height and keeps the front pieces out of your face, while the loose ends preserve the relaxed feel of a short cut. It works best on a bob long enough to reach a small elastic without pulling. Leave the knot slightly undone for a softer finish.
4. Soft Curly Crop
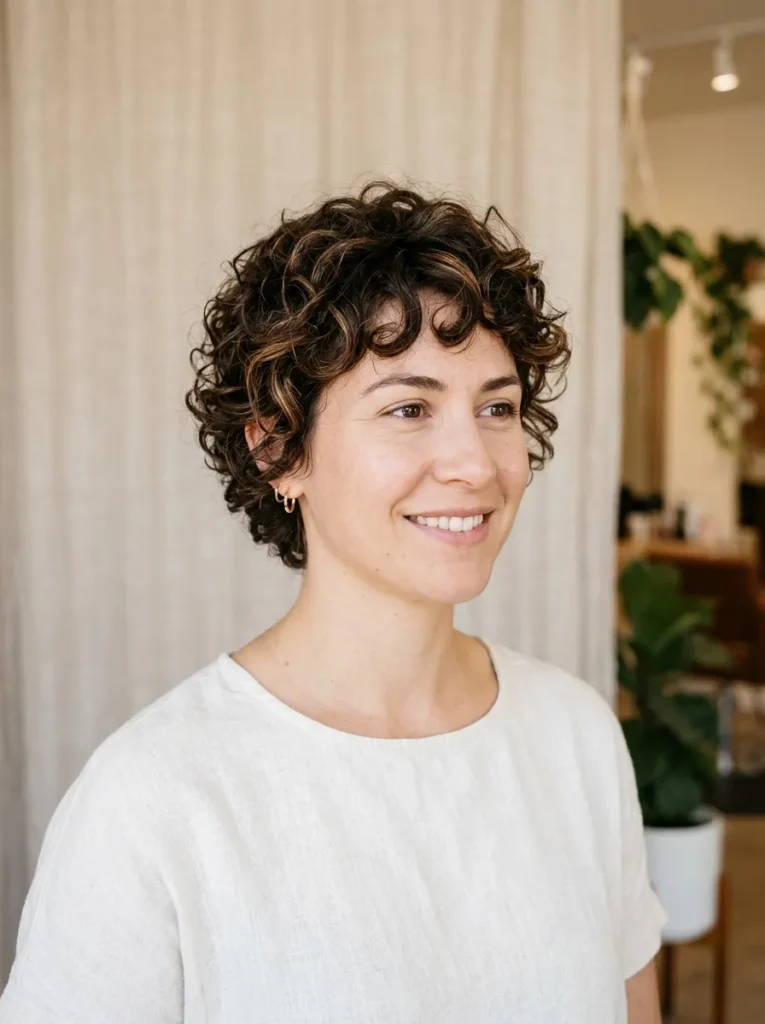
BEFORE:
Short curls can sometimes appear bulky around the sides, especially when all the hair is cut to one length. Without the right shape, natural volume may feel difficult to control.
AFTER:
A softly layered curly crop creates a rounded silhouette with better definition. The shorter sides keep the haircut light, while the crown retains beautiful natural volume.
For styling, apply a lightweight curl cream to soaking-wet hair and scrunch gently with your hands. Let the curls air-dry or use a diffuser on low heat. Ask your stylist to shape your curls while considering their natural shrinkage, so the finished cut does not become shorter than expected.
5. Blunt Micro Bob

- Choose the length: Ask your stylist for a bob that sits between the cheekbones and jawline, depending on your face shape.
- Create the outline: Request a clean, blunt perimeter with minimal layering for a fuller appearance.
- Smooth the hair: Apply heat protectant before blow-drying with a paddle brush.
- Finish the ends: Use a flat iron to create a smooth line, keeping the tips straight rather than curled inward.
The sharp outline gives this cropped bob its signature charm. It is especially appealing for straight or fine hair because the solid edge can make the ends appear denser. Regular trims help maintain its precise shape, so schedule maintenance before the perimeter starts looking uneven.
Also Visit : 22 Elegant Natural Hair Bun Styles for Effortless Days
6. Braided Accent Bob
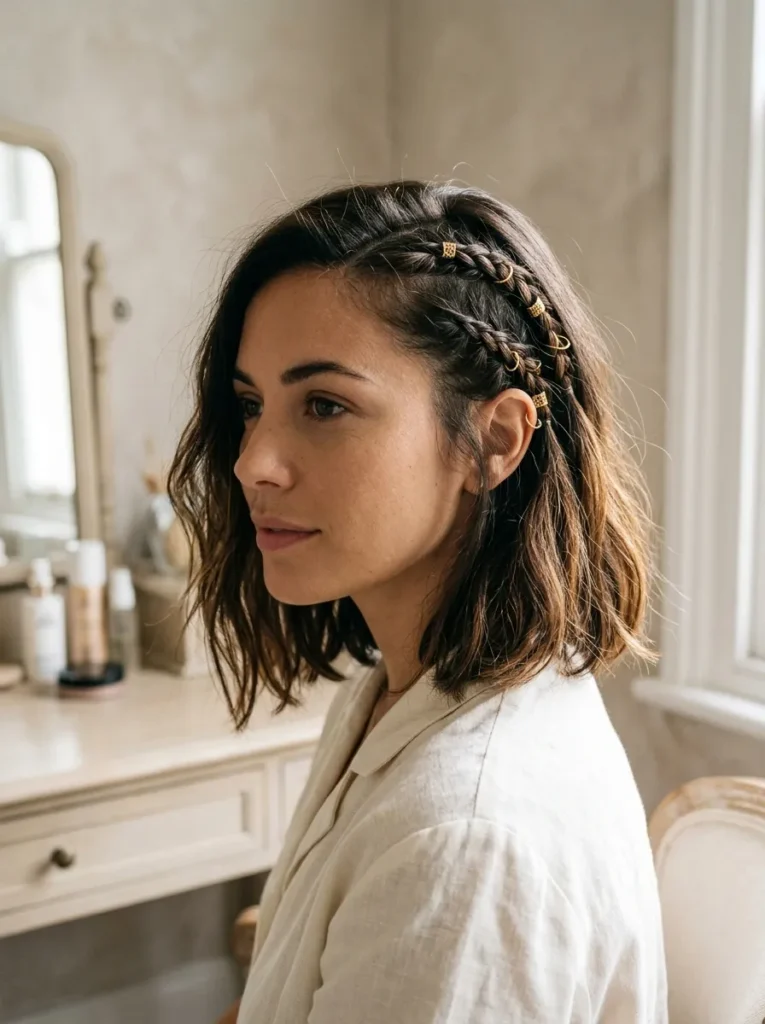
| Styling Detail | Option A: Single Braid | Option B: Double Braids |
| Appearance | Minimal and delicate | Playful and noticeable |
| Styling Time | 3 to 5 minutes | 5 to 8 minutes |
| Best For | Everyday casual looks | Festivals and outings |
| Accessories | Small clear elastic | Tiny gold cuffs or clips |
A braided accent gives a simple bob an interesting detail without changing its length or overall shape. Start with a small section near the temple and braid it close to the scalp, securing the end behind your ear. Leave the remaining hair loose and add a tiny accessory for extra charm.
7. Wispy Bangs Bob

DO:
- Ask for lightweight bangs that gently skim the eyebrows.
- Keep the bob slightly layered around the face.
- Use a small round brush to shape the fringe.
- Apply a little texturizing spray for soft movement.
DON’T:
- Cut the fringe too short without discussing its natural shrinkage.
- Use heavy styling creams near the roots.
- Make the bangs excessively thick if you prefer a lighter appearance.
Wispy fringe adds a delicate detail to a short bob without hiding the rest of your haircut. I’ve noticed that slightly separated bangs tend to look more natural than perfectly combed ones. A quick blow-dry with a small brush keeps the fringe in place while preserving its airy finish.
8. Flipped-Out Pixie

Skill Level: Easy to Moderate
Styling Time: 5 to 10 minutes
Best For: Short pixie cuts with slightly longer sides
Tools: Small round brush, blow dryer, heat protectant, lightweight styling wax
A little outward movement gives a traditional pixie a fun, retro-inspired finish. Start with slightly damp hair and direct the side sections outward using a small round brush and blow dryer. In my experience, a tiny amount of styling wax helps hold the flipped ends without making short layers look greasy or stiff.
9. Mini Space Buns

Mini space buns bring a cheerful twist to shorter hair, especially when you have enough length at the crown to create two small sections. Separate the top half down the middle, secure each section with a tiny elastic, and twist the ends into compact buns. A few loose strands make the style look relaxed.
This playful look works particularly well for casual weekends, outdoor events, and summer outfits. For shorter layers that escape the elastics, use two or three discreet bobby pins to secure them. Keep the buns slightly uneven rather than perfectly identical for a softer finish that feels comfortable and fun.
10. Deep Side Part
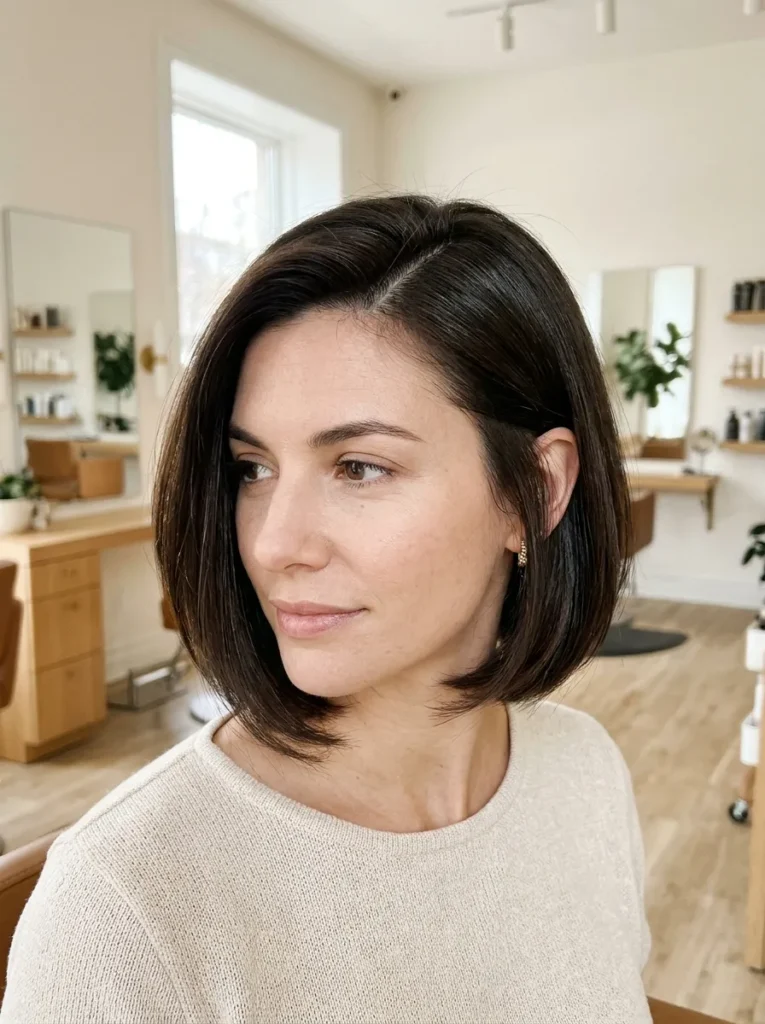
- Create a deep part starting above one eyebrow and extending toward the crown.
- Apply a lightweight smoothing serum to damp hair to control flyaways.
- Blow-dry the heavier section across the forehead using a round brush.
- Tuck the opposite side behind your ear and secure it with a discreet pin.
- Finish with a light mist of flexible-hold hairspray.
Changing your part is a simple styling trick that gives a familiar haircut a fresh appearance. It adds visual asymmetry and can create extra volume around the crown. This look works particularly well with bobs and cropped cuts that have enough length on top to sweep naturally.
Also Visit : 24 Collarbone Length Hair Looks for a Bold New Feel
11. Pearl Clip Bob

Quick Tip:
Choose two or three small pearl clips in slightly different sizes for a delicate layered effect. Place them above one ear, following the natural curve of your hairline, and secure them over a small section for better grip.
Pearl accessories bring a pretty finishing detail to even the simplest short haircut. They work beautifully with straight bobs, loose waves, and softly curled ends. For everyday styling, keep the rest of your hair natural and let the clips provide the main decorative touch.
12. Layered Shaggy Bixie
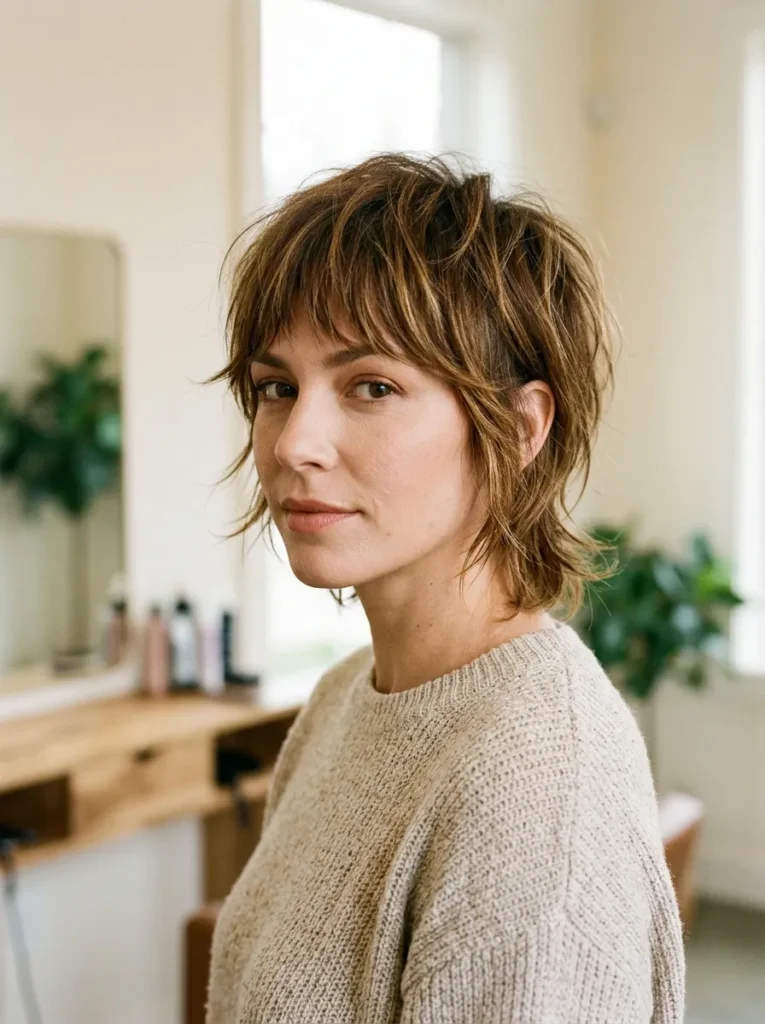
BEFORE:
A short haircut without enough layering can look flat around the crown and bulky near the sides. Growing out a pixie can also leave uneven lengths that feel difficult to style.
AFTER:
A shaggy bixie introduces shorter crown layers and longer pieces around the ears and neckline. The result has more movement, a softer outline, and a naturally tousled appearance.
Ask your stylist to blend the layers rather than creating harsh disconnected sections. For daily styling, apply a small amount of lightweight mousse to damp hair and lift the crown with your fingers while blow-drying. This cut is especially useful for anyone who enjoys the freedom of a pixie with a little extra length.
13. Tousled Beach Waves
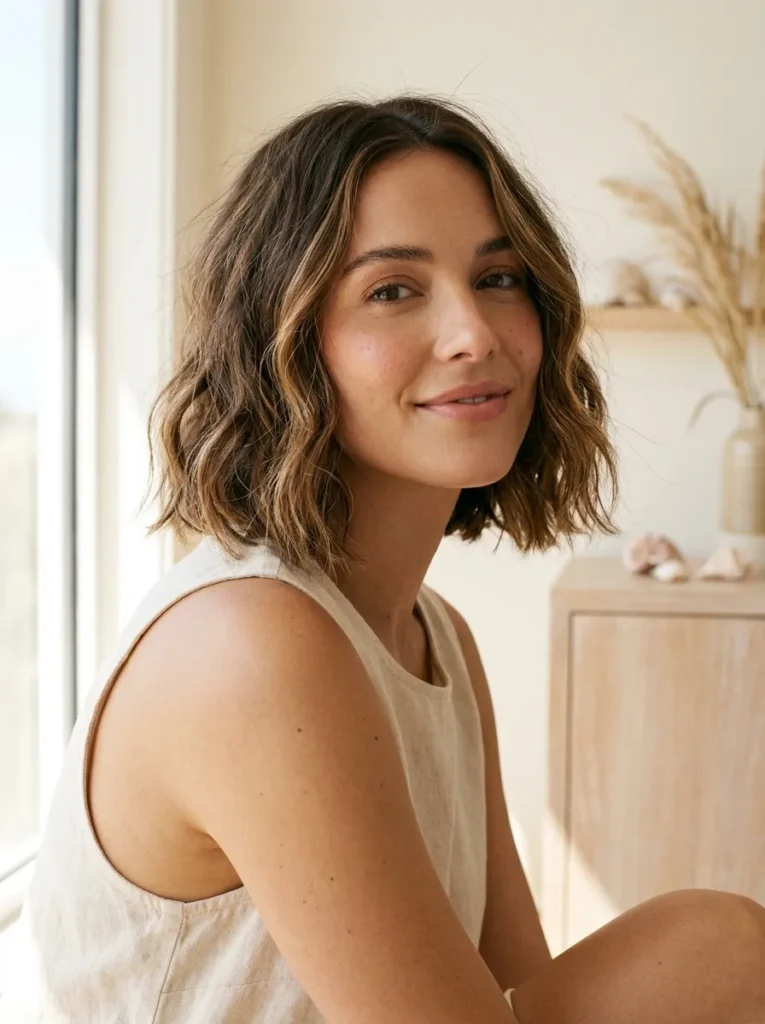
- Prepare the hair: Apply a lightweight heat protectant to completely dry hair.
- Create loose bends: Wrap small sections around a curling wand, leaving the last inch of each section straight.
- Alternate directions: Curl some sections away from your face and others toward it for natural-looking movement.
- Separate the waves: Let the hair cool, then gently loosen the curls with your fingers.
- Finish the look: Mist with flexible-hold texturizing spray for a soft, lived-in texture.
Beach waves give a short bob a relaxed finish with plenty of movement. They are especially flattering when the ends have a little natural texture. Avoid making every curl identical. Slight variations create the casual, airy appearance that makes this hairstyle so appealing for everyday wear.
14. Sleek Tucked Bob

| Styling Detail | Option A: Natural Tuck | Option B: Polished Tuck |
| Hair Finish | Soft and slightly textured | Smooth and glossy |
| Styling Product | Lightweight leave-in cream | Smoothing serum |
| Ear Detail | Simple stud earrings | Statement gold earrings |
| Overall Look | Relaxed and casual | Refined and elegant |
A tucked bob lets your haircut frame your face without covering your cheekbones or jawline. Start with a middle or slightly off-center part, smooth the sides, and gently tuck them behind your ears. For extra hold, place small bobby pins underneath the hair near the nape where they remain hidden.
15. Curly Side-Part Pixie

DO:
- Apply curl cream to damp hair using your fingertips.
- Create a side part while the hair is still wet.
- Use a diffuser on low heat to preserve curl definition.
- Leave a little extra length on top for natural volume.
DON’T:
- Brush dry curls, as this can create unwanted frizz.
- Apply heavy oils that weigh down the shorter sections.
- Cut every curl to the same length without considering shrinkage.
- Overload the roots with styling products.
A side-parted curly pixie creates an attractive balance between defined curls and shorter tapered sides. The sweeping top section adds shape without requiring complicated styling. I’ve noticed that keeping the crown slightly longer gives natural curls more room to form their own pattern and creates a softer finish.
Also Visit : 22 Stunning Hoco Hairstyles for a Picture-Perfect Night
16. Feathered Crop
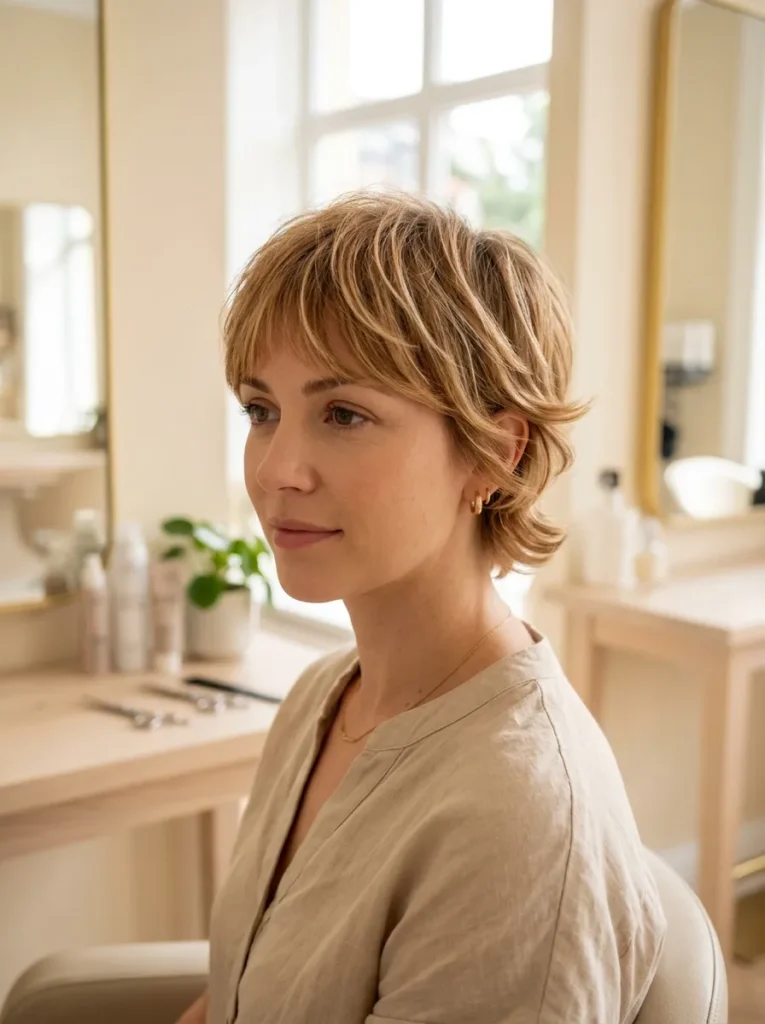
Length: Above the ears with a slightly longer crown
Styling Time: 5 to 10 minutes
Skill Level: Beginner-friendly
Best For: Fine to medium hair with natural movement
Styling Tools: Small round brush, blow dryer, lightweight texturizing cream
Feathered layers give a cropped haircut a softer outline without sacrificing its playful shape. Direct your blow dryer downward while lifting the crown with your fingers, then use a small brush to flick the ends outward. A little styling cream helps separate the layers while keeping the finish touchable rather than stiff.
17. Ribbon-Tied Bob
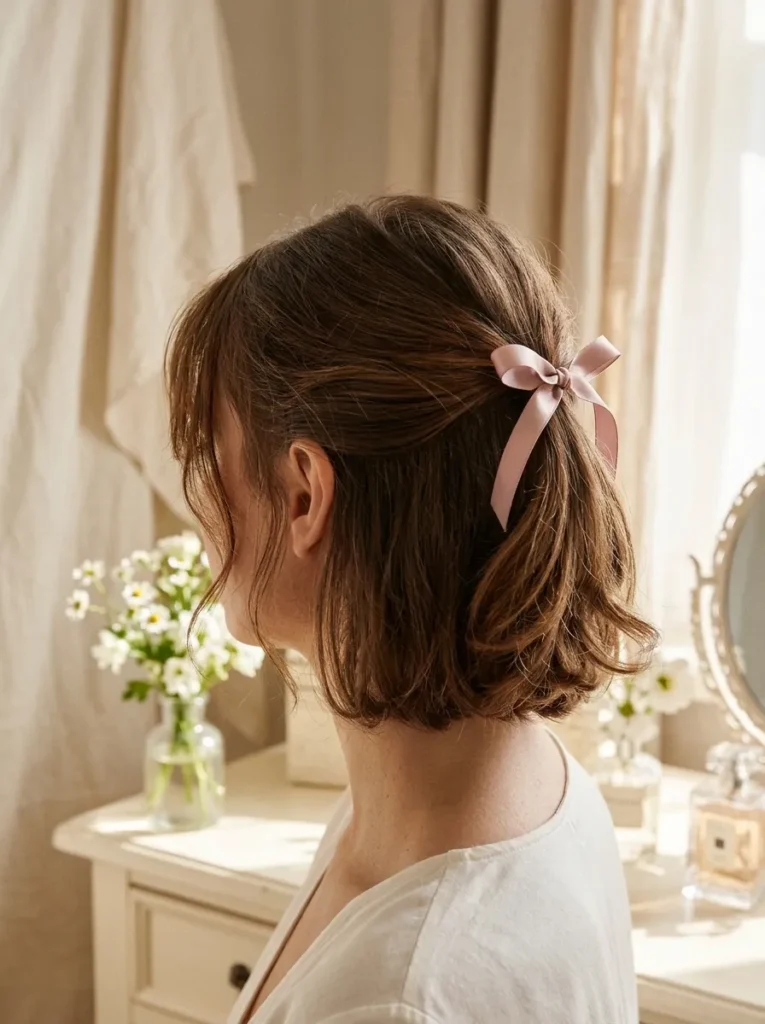
A satin ribbon brings a sweet, feminine detail to an ordinary short bob. Gather a small section from each side of the crown, bring them together at the back, and secure them with a thin elastic before tying the ribbon into a neat bow.
Choose pastel pink, cream, lavender, or black depending on your outfit. A narrow ribbon keeps the hairstyle delicate, while a wider bow creates a more noticeable accessory. Keep the lower layers loose and lightly waved for contrast. This style works especially well for brunch dates, birthday celebrations, and casual summer outfits.
18. Mini Bubble Ponytails
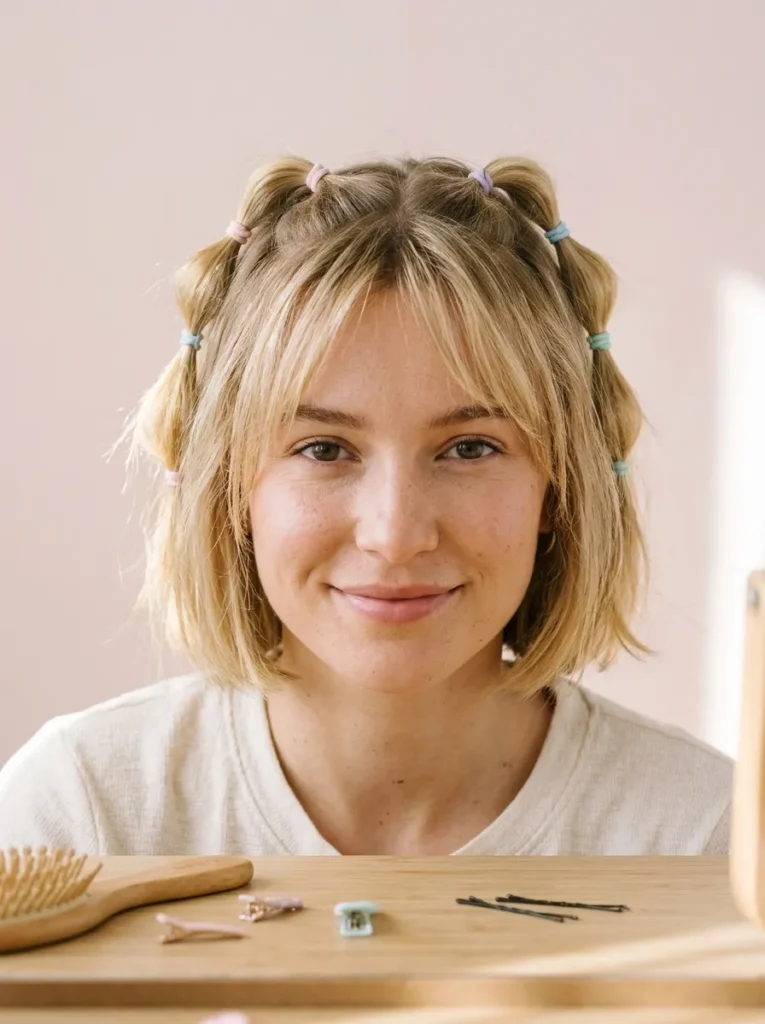
- Section the hair: Divide the top portion into four small sections, working from the forehead toward the crown.
- Secure each ponytail: Use miniature clear or pastel elastics to create small ponytails.
- Create the bubbles: Add another elastic slightly below each first band, depending on your available hair length.
- Add volume: Gently pull the hair between the elastics to create rounded bubble shapes.
- Finish the edges: Smooth flyaways with a small amount of lightweight styling cream.
Mini bubble ponytails add a playful, youthful detail without needing long hair. They work best when the upper layers are long enough to stay inside small elastics. Keep the bubbles loose rather than pulling them tightly, and choose matching pastel bands for a coordinated Pinterest-worthy finish.
19. Mini Claw Clip Twist
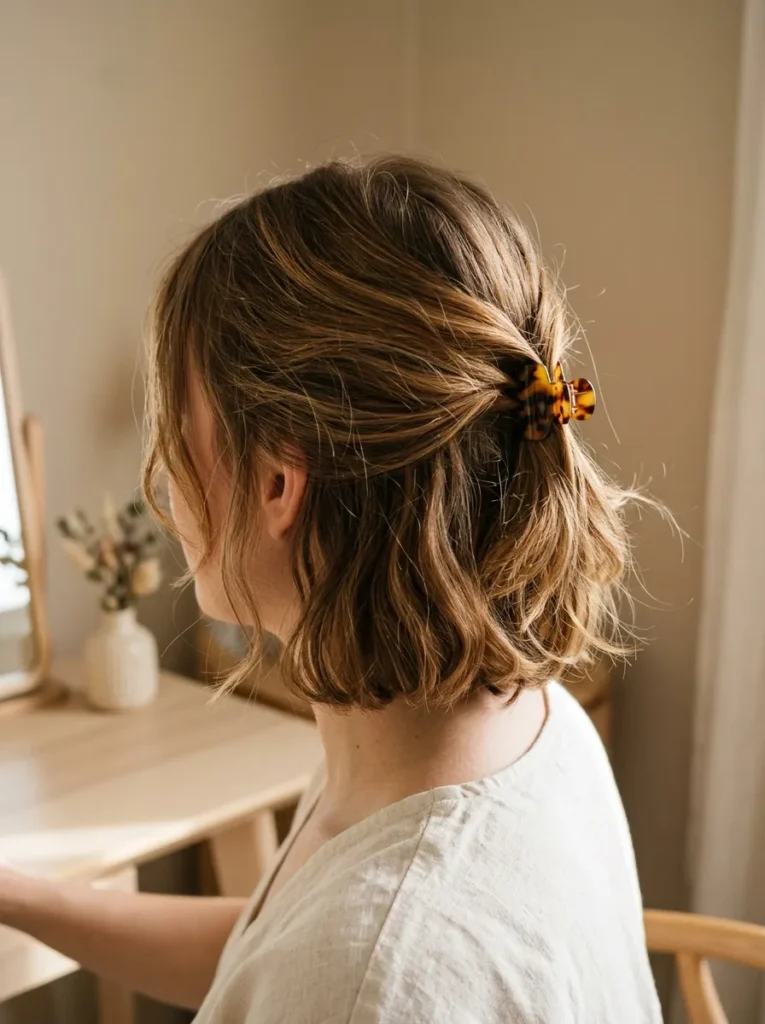
Quick Tip:
Choose a miniature claw clip that comfortably holds your hair without slipping. Twist a small section from each side toward the back, join them at the crown, and secure them with the clip.
This simple hairstyle adds a pretty detail while keeping the front sections away from your face. Small tortoiseshell, pastel, or pearl clips work especially well with short bobs. Leave a few delicate pieces loose around the temples for a softer finish that feels relaxed rather than overly styled.
20. Side-Pinned Waves

BEFORE:
Loose waves can sometimes fall across the face, making a short hairstyle look messy or difficult to manage. Simply pushing the hair behind your ear may not keep everything in place throughout the day.
AFTER:
Sweeping one side backward and securing it with decorative pins creates a cleaner outline. The opposite side keeps its soft waves, giving the haircut an attractive asymmetrical finish.
Create loose waves with a curling wand, then gently separate them using your fingers. Gather a small section above one ear and secure it with two crossed bobby pins or decorative clips. Keep the pinned section relatively flat so the accessories remain visible and the hairstyle stays comfortable.
Also Visit : 21 Bold Concert Hairstyles That Keep You Party-Ready
21. Rounded Fringe Bob

- Choose your fringe: Ask your stylist for a rounded fringe that complements your forehead and eyebrow shape.
- Shape the bob: Keep the perimeter around the jawline with softly blended layers.
- Dry the fringe: Use a small round brush, directing the hair forward and slightly inward.
- Smooth the ends: Blow-dry the lower sections using a paddle brush or finish with a flat iron.
- Set the shape: Apply a light flexible-hold hairspray to maintain the rounded finish.
A curved fringe gives a classic short bob a softer, more playful appearance. It works particularly well with straight and slightly wavy hair because the front sections naturally follow the rounded shape. Ask your stylist to leave enough length for adjustments, especially if you are trying bangs for the first time.
22. Twisted Crown Bob
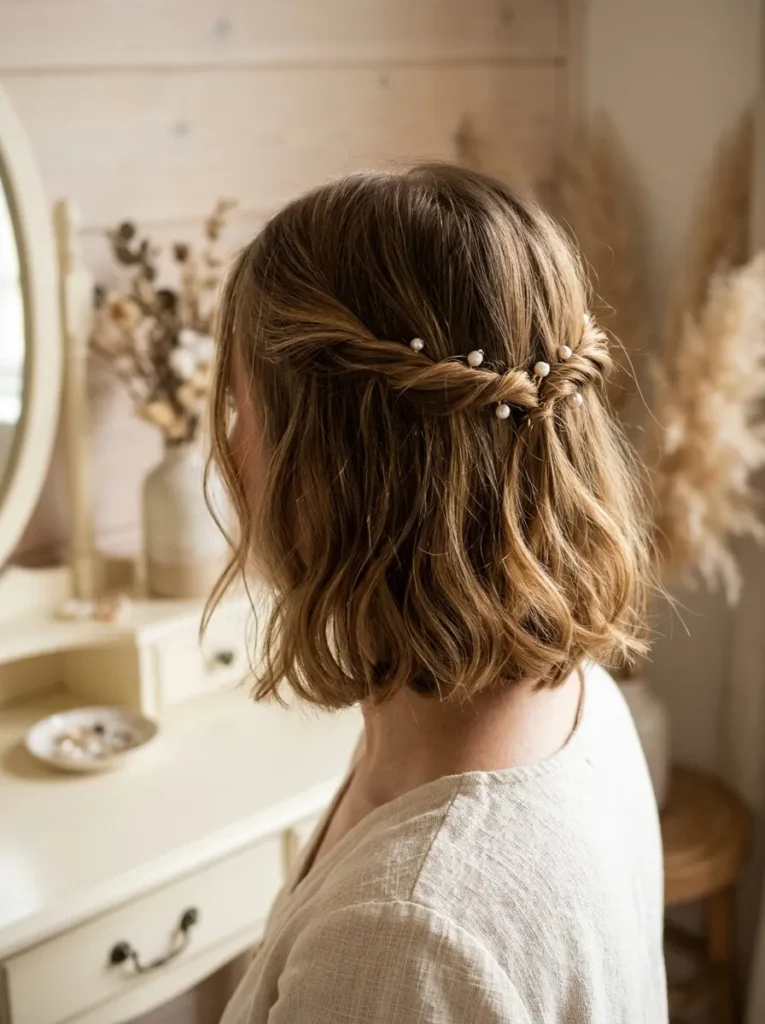
| Styling Detail | Option A: Single Twist | Option B: Double Twist |
| Appearance | Simple and understated | Detailed and romantic |
| Styling Time | 3 to 5 minutes | 5 to 8 minutes |
| Accessories | Small clear elastic | Pearl or gold pins |
| Best For | Everyday casual looks | Parties and special outings |
A twisted crown adds an elegant detail while keeping the front sections away from your face. Take a small section from each temple, twist both backward, and secure them together at the back of your head. Leave the remaining bob loose, adding soft waves for extra texture and movement.
23. Spiky Textured Pixie

DO:
- Apply a small amount of matte styling paste to dry hair.
- Lift individual crown sections using your fingertips.
- Keep the sides neatly tapered for contrast.
- Adjust the direction of the spikes to create natural-looking texture.
DON’T:
- Use too much gel, which can make the hair look stiff.
- Pull every section straight upward.
- Apply heavy oils that flatten the crown.
- Overuse hairspray if you prefer a flexible finish.
A textured pixie is a fun choice for anyone who enjoys a little edge in their everyday hairstyle. The separated crown pieces create height and definition, while the shorter sides keep everything balanced. Start with very little product and add more only where the hair needs extra hold.
24. Soft Pinned-Back Bob

Styling Time: 3 to 5 minutes
Skill Level: Beginner-friendly
Accessories: Two small decorative clips or bobby pins
Best For: Straight, wavy, and lightly layered bobs
Softly pinned-back sections create a neat, pretty hairstyle without requiring heat tools or complicated techniques. Take a small front section from each side, gently twist it backward, and secure it just above your ears. Keep the remaining hair loose, allowing its natural texture to add movement. Pearl, gold, and floral clips provide a delicate finishing touch for everyday outfits or special occasions.
Also Visit : 24 Gorgeous Shoulder Length Hairstyles for Easy Styling
CONCLUSION
The best short hairstyle is one that feels comfortable, suits your natural texture, and fits the way you live. From soft bobs and curly crops to playful pixies and simple pinned styles, these cute short hairstyles offer plenty of ways to refresh your look without needing a complicated routine.
Start with one idea that matches your current length, then adjust the part, texture, or accessories to make it your own. Save this article on Pinterest so your favorites are easy to find, and share it with a friend looking for a fresh haircut idea. A small change can be a fun new beginning.